[fusion_builder_container hundred_percent=”yes” overflow=”visible”][fusion_builder_row][fusion_builder_column type=”1_1″ background_position=”left top” background_color=”” border_size=”” border_color=”” border_style=”solid” spacing=”yes” background_image=”” background_repeat=”no-repeat” padding=”” margin_top=”0px” margin_bottom=”0px” class=”” id=”” animation_type=”” animation_speed=”0.3″ animation_direction=”left” hide_on_mobile=”no” center_content=”no” min_height=”none”][fusion_title size=”1 “]Mouse Pointer Visibility[/fusion_title]
These adjustments are helpful if you have difficultues viewing the mouse pointer.
Help for users with Microsoft Windows based computers.
Help for users with AppleMacintosh OS X based computers.
Windows XP
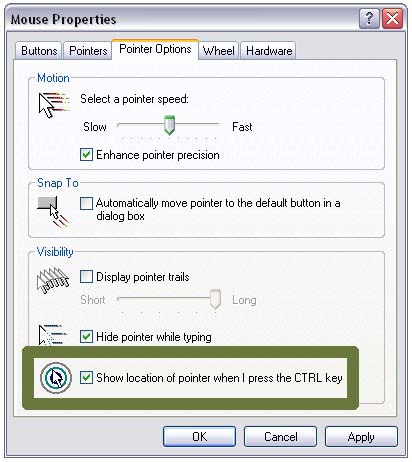
Find the pointer
- Click the Start button or press the Windows logo key on your keyboard.
- Open the Control Panel. Click on Control Panel or press C on your keyboard and it will pop up.
- Open the Mouse Properties. Double-click the Mouse icon or press M until the Mouse icon is highlighted and press Enter. The Mouse window will pop up.
- Click the Pointer Options tab, or press Ctrl and Tab until the Pointer Options tab comes to the front.
- Click the checkbox that says “Show location of pointer when I press the CTRL key” or press Alt and S on the keyboard to check the box.
- To confirm your choice and exit Mouse Properties press Enter on your keyboard or click the OK icon.
- From here on in, press CTRL on the keyboard when you cannot find the mouse pointer. This will surround it with circles to make it easier to find.
Make pointer larger
- Click the Start button or press the Windows logo key on your keyboard.
- Open the Control Panel. Click on Control Panel or press C on your keyboard and it will pop up.
- Open the Mouse Properties. Double-click the Mouse icon or press M until the Mouse icon is highlighted and press Enter. The Mouse window will pop up.
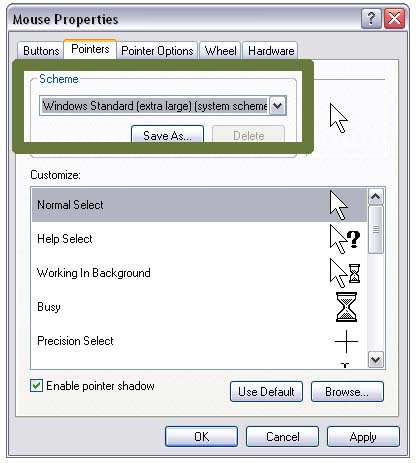
- Click the Pointer tab, or press Ctrl and Tab until the Pointer tab comes to the front.
- Click the Scheme box, or press Tab until its drop-down menu is highlighted.
- Use the up/down arrows on the keyboard to move through the list. The preview images will change to reflect the chosen scheme.
- Choose a scheme. The best sets for visibility are labelled as Large, Extra Large or Inverted. Press Enter on your keyboard if it is already highlighted, or click on it with your mouse.
- To exit the Mouse Properties press Enter on your keyboard or click the OK icon.
Add trails to your pointer
- Click the Start button or press the Windows logo key on your keyboard.
- Open the Control Panel. Click on Control Panel or press C on your keyboard and it will pop up.
- Open the Mouse Properties. Double-click the Mouse icon or press M until the Mouse icon is highlighted and press Enter. The Mouse window will pop up.
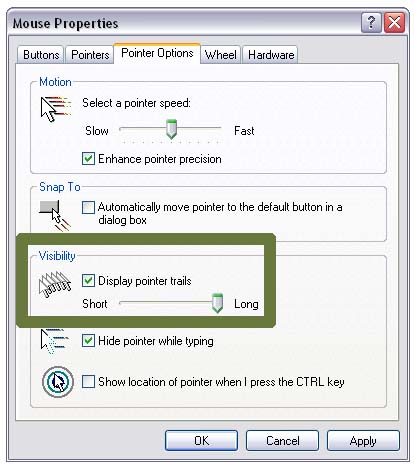
- Click the Pointer Options tab, or press Ctrl and Tab until the Pointer Options tab comes to the front.
- Click the checkbox that says Display pointer trails or press Alt and D on the keyboard.
- To adjust the size of the pointer trails, drag the slider under Display pointer trails or press Tab until the slider bar is highlighted and use the left/right arrow keys to adjust.
- To select this option and exit Mouse Properties press Enter on your keyboard or click the OK icon.
Apple OS X
- Use your mouse to click on the Apple menu or press Control and F2 and then press Enter.
- Use your mouse to click on System Preferences or use the down arrow key to highlight System Preferences and then press Enter.
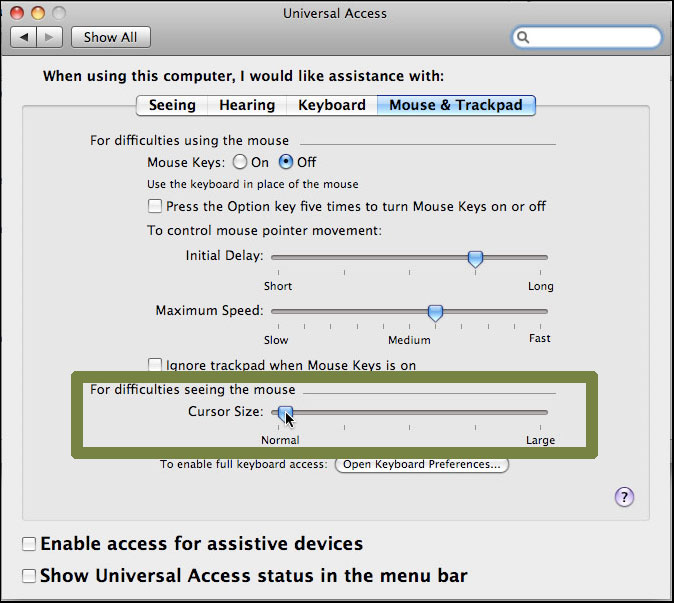
- Use your mouse to click on the Universal Access icon or use the tab key repeatedly to highlight the Universal Access icon and then press the spacebar.
- Use your mouse to click on the Mouse tab or press Control and F7 and then the right arrow key to highlight the Mouse tab and then press the spacebar.
- Use your mouse to click on the Cursor Size bar and move the bar to the right or left in order to change the size of the mouse pointer. Alternately, use the tab key repeatedly to highlight the Cursor Size bar and then the right and left arrow keys to increase or decrease the pointer size.
- When you are happy with your pointer size, use your mouse to click the red Close button at the top left of the Universal Access window or press Command and W to close the
window.
- Use your mouse to click on the Apple menu or press Control and F2 and then press Enter.
- Use your mouse to click on System Preferences or use the down arrow key to highlight System Preferences and then press Enter.
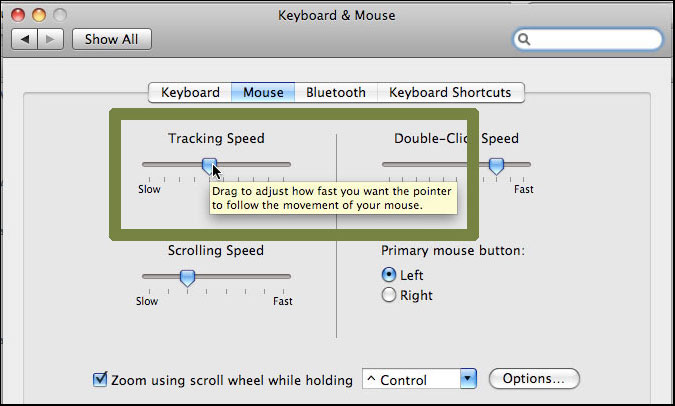
- Use your mouse to click on the Keyboard & Mouse icon or use the tab key repeatedly to highlight the Keyboard & Mouse icon and then press the spacebar.
- Use your mouse to click on the Mouse tab or press Control and F7 and then the right arrow key to highlight the Mouse tab and then press the spacebar.
- Use your mouse to click on the Tracking Speed bar and move the bar to the right or left in order to change the speed of the mouse pointer. Alternately, use the tab key repeatedly to highlight the Tracking Speed bar and then the right and left arrow keys to change the speed of the pointer.
- When you are happy with your pointer speed, use your mouse to click the red Close button at the top left of the Keyboard & Mouse window or press Command and W to close the window.
[/fusion_builder_column][/fusion_builder_row][/fusion_builder_container]